Thursday, February 9, 2012

Microsoft windows Run Commands For Windows 7


I had found while browsing so I would like to share with every one.

Here is a List of commands that you can run off from the Run Command prompt in Windows 7:

Windows logo key + R 


Administrative Tools

Administrative Tools = control admintools
Authorization Manager = azman.msc
Component Services = dcomcnfg
Certificate Manager = certmgr.msc
Direct X Troubleshooter = dxdiag
Display Languages = lpksetup
ODBC Data Source Administrator = odbcad32
File Signature Verification Tool = sigverif
Group Policy Editor = gpedit.msc
Add Hardware Wizard = hdwwiz.cpl
iSCSI Initiator = iscsicpl
Iexpress Wizard = iexpress
Local Security Settings = secpol.msc
Microsoft Support Diagnostic Tool = msdt
Microsoft Management Console = mmc
Print management = printmanagement.msc
Printer User Interface = printui
Problems Steps Recorder = psr
People Near Me = p2phost
Registry Editor = regedit or regedt32
Resoure Monitor = resmon
System Configuration Utility = msconfig
Resultant Set of Policy = rsop.msc
SQL Server Client Configuration = cliconfg
Task Manager = taskmgr
Trusted Platform Module = tpm.msc
TPM Security Hardware = TpmInit
Windows Remote Assistance = msra
Windows Share Folder Creation Wizard = shrpubw
Windows Standalong Update Manager = wusa
Windows System Security Tool = syskey
Windows Script Host Settings = wscript
Windows Version = winver
Windows Firewall with Advanced Security = wf.msc
Windows Memory Diagnostic = MdSched
Windows Malicious Removal Tool = mrt


Computer Management

Computer Management = compmgmt.msc or CompMgmtLauncher
Task Scheduler = control schedtasks
Event Viewer = eventvwr.msc
Shared Folders/MMC = fsmgmt.msc
Local Users and Groups = lusrmgr.msc
Performance Monitor = perfmon.msc
Device Manager = devmgmt.msc
Disk Management = diskmgmt.msc
Services = services.msc
Windows Management Infrastructure = wmimgmt.msc

Conrtol Panel

Control Panel = control
Action Center= wscui.cpl
Autoplay = control.exe /name Microsoft.autoplay
Backup and Restore = sdclt
Create a System Repair disc = recdisc
BDE Administrator = bdeadmin.cpl
Color Management = colorcpl
Credential Manager = control.exe /name Microsoft.CredentialManager
Credential Manager Stored User Names and Passwords = credwiz
Date and Time Properties = timedate.cpl
Default Programs = control.exe /name Microsoft.DefaultPrograms
Set Program Access and Computer Defaults = control appwiz.cpl,,3 or ComputerDefaults
Devices and Printers = control printers
Devices and Printers Add a Device = DevicePairingWizard
Display = dpiscaling
Screen Resolution = desk.cpl
Display Color Calibration = dccw
Cleartype Text Tuner = cttune
Folders Options = control folders
Fonts = control fonts
Getting Started = GettingStarted
HomeGroup = control.exe /name Microsoft.HomeGroup
Indexing Options = control.exe /name Microsoft.IndexingOptions
Internet Properties = inetcpl.cpl
Keyboard = control keyboard
Location and Other Sensors = control.exe /name Microsoft.LocationandOtherSensors
Location Notifications = LocationNotifications
Mouse = control mouse or main.cpl
Network and Sharing Center = control.exe /name Microsoft.NetworkandSharingCenter
Network Connections = control netconnections or ncpa.cpl
Notification Area Icons = control.exe /name Microsoft.NotificationAreaIcons
Parental Controls = control.exe /name Microsoft.ParentalControls
Performance Information = control.exe /name Microsoft.PerformanceInformationandTools
Personalization = control desktop
Windows Color and Appearance = control color
Phone and Modem Options = telephon.cpl
Power Configuration = powercfg.cpl
Programs and Features = appwiz.cpl or control appwiz.cpl
Optional Features Manager = optionalfeatures or control appwiz.cpl,,2
Recovery = control.exe /name Microsoft.Recovery
Regional and Language = intl.cpl
RemoteApp = control.exe /name Microsoft.RemoteAppandDesktopConnections
Sound = mmsys.cpl
Volume Mixer = sndvol
System Properties = sysdm.cpl or Windows logo key + Pause/Break
SP ComputerName Tab = SystemPropertiesComputerName
SP Hardware Tab = SystemPropertiesHardware
SP Advanced Tab = SystemPropertiesAdvanced
SP Performance = SystemPropertiesPerformance
SP Data Execution Prevention = SystemPropertiesDataExecutionPrevention
SP Protection Tab = SystemPropertiesProtection
SP Remote Tab = SystemPropertiesRemote
Windows Activation = slui
Windows Activation Phone Numbers = slui 4
Taskbar and Start Menu = control.exe /name Microsoft.TaskbarandStartMenu
Troubleshooting = control.exe /name Microsoft.Troubleshooting
User Accounts = control.exe /name Microsoft.UserAccounts
User Account Control Settings = UserAccountControlSettings
User Accounts Windows 2000/domain version = netplwiz or control userpasswords2
Encryption File System = rekeywiz
Windows Anytime Upgrade = WindowsAnytimeUpgradeui
Windows Anytime Upgrade Results = WindowsAnytimeUpgradeResults
Windows CardSpace = control.exe /name Microsoft.cardspace
Windows Firewall = firewall.cpl
WindowsSideshow = control.exe /name Microsoft.WindowsSideshow
Windows Update App Manager = wuapp

Accessories

Calculator = calc
Command Prompt = cmd
Connect to a Network Projector = NetProj
Presentation Settings = PresentationSettings
Connect to a Projector = displayswitch or Windows logo key + P
Notepad = notepad
Microsoft Paint = mspaint.exe
Remote Desktop Connection = mstsc
Run = Windows logo key + R
Snipping Tool = snippingtool
Sound Recorder = soundrecorder
Sticky Note = StikyNot
Sync Center = mobsync
Windows Mobility Center (Only on Laptops) = mblctr or Windows logo key + X
Windows Explorer = explorer or Windows logo key + E
Wordpad = write
Ease of Access Center = utilman or Windows logo key + U
Magnifier = magnify
Narrator = Narrator
On Screen Keyboard = osk
Private Character Editor = eudcedit
Character Map = charmap
Ditilizer Calibration Tool = tabcal
Disk Cleanup Utility = cleanmgr
Defragment User Interface = dfrgui
Internet Explorer = iexplore
Rating System = ticrf
Internet Explorer (No Add-ons) = iexplore -extoff
Internet Explorer (No Home) = iexplore about:blank
Phone Dialer = dialer
Printer Migration = PrintBrmUi
System Information = msinfo32
System Restore = rstrui
Windows Easy Transfer = migwiz
Windows Media Player = wmplayer
Windows Media Player DVD Player = dvdplay
Windows Fax and Scan Cover Page Editor = fxscover
Windows Fax and Scan = wfs
Windows Image Acquisition = wiaacmgr
Windows PowerShell ISE = powershell_ise
Windows PowerShell = powershell
XPS Viewer = xpsrchvw

Open Documents folder = documents
Open Pictures folder = pictures
Open Music folder = music
Open Favorites folder = favorites
Open Downloads folder = downloads
Logs out of Windows = logoff
Shuts Down Windows = shutdown


Hope it will be useful click "Like" share with others

Wednesday, January 18, 2012

EDATE-Calculate a date which is a specific number of months in the past or in the future


What Does It Do?

This function is used to calculate a date which is a specific number of months in the past or

in the future.


Syntax

=EDATE(StartDate,Months)


Formatting


The result will normally be expressed as a number, this can be formatted to represent
a date by using the Format,Cells,Number,Date command.


Example


This example was used by a company hiring contract staff.
The company needed to know the end date of the employment.
The Start date is entered.
The contract Duration is entered as months.
The =EDATE() function has been used to calculate the end of the contract.


The company decide not to end contracts on Saturday or Sunday.
The =WEEKDAY() function has been used to identify the actaul weekday number of the end date.
If the week day number is 6 or 7, (Sat or Sun), then 5 is subtracted from the =EDATE() to 
ensure the end of contract falls on a Friday.


Tuesday, December 6, 2011

Add Indian rupee symbol in EXCEL / WORD


We going to see How can we use Indian rupee symbol in Ms Excel / Ms Word


Steps to follow


1. Download the font Rupee.ttf  from following link: http://goo.gl/9Ta7e or the new version Rupee_Foradian.ttf in Google
2. Just copy the font and paste it in "Fonts" folder in control panel
Then open the Excel and change the fond to "Rupee". Press ` key to get rupee symbol. (Key before number1)


Sunday, November 13, 2011

How to remove hyperlink in excel in one shot?

May be you have using this macro already.

Option A


Select the Hyper-linked cells before you run following macro


Sub Macro()
    Selection.Hyperlinks.Delete
End Sub


If you don't know where to paste above macro.
     
              a)Press Alt+F11 to open VB editor
              b)Press Alt+I+M to open Madule
Then paste and press F5 to Run.


Option B


Select the Hyper-linked cells and copy. Paste special and value


Tuesday, September 27, 2011

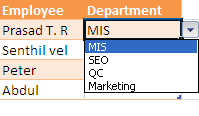
Create a Drop Down List in Excel

To make data entry easier in Excel, or to limit entries to certain items that you define, you can create a drop-down list of valid entries that is compiled from cells elsewhere on the worksheet. When you create a drop-down list for a cell, it displays an arrow next to that cell. To enter information in that cell, click the arrow, and then click the entry that you want.


We can create drop-down list by using " Data Validation" in Data menu.


1. To create a list of valid entries for the drop-down list, type the entries in a single column or row without blank cells. For example:

2.Then select the cell where you want to apply drop-down list.

3. To open Data validation window Click "Data Validation" option in Data menu


4. Choose "List"  in drop-down menu and choose the source.


It will through the Error message if we do manual entry. We can also customise the Error message.


Error Window
 

Select "Error Alert" Tab in Data Validation window. 


After enter the error message click OK. after that you will get follow error message.


To delete a drop down list, select the cell with the list. Click the Data menu, and then click Validation. In the Data Validation dialog box, click the Settings tab, and then click Clear All.

The maximum number of entries that you can have in a drop-down list is 32,767.

Tuesday, September 13, 2011

Microsoft Excel DGET formula


DGET

We can use DGET function when we have multiple criteria, we can use this as a alternative function of VLOOKUP function.


    How many boxes of a particular item do we have in stock?


     What Does It Do ? 
 This function examines a list of information and produces one result. If more than one record matches the criteria the error #NUM is shown. If no records match the criteria the error #VALUE is shown.
     
    Syntax
=DGET(DatabaseRange,FieldName,CriteriaRange) 

 The DatabaseRange is the entire list of information you need to examine, including the field names at the top of the columns. 

 The FieldName is the name, or cell, of the values to Get, such as "Value Of Stock" or I3. 

 The CriteriaRange is made up of two types of information.
 The first set of information is the name, or names, of the Fields(s) to be used as the basis    for selecting the records, such as the category Brand or Wattage.    

The second set of information is the actual record which needs to be selected, such     as Horizon as a brand name, or 100 as the wattage. 

Formatting
 No special formatting is needed.

Example 1
 This example extracts information from just one record.

 How many boxes of a particular item do we have in stock?


Example 2 
 This example extracts information from multiple records and therefore shows the #NUM error. 

 How many boxes of a particular item do we have in stock?  

Example 3 
 This example extracts information from no records and therefore shows the #VALUE error. 

 How many boxes of a particular item do we have in stock? 


Example 4 
 This example uses the =IF() function to display a message when an error occurs. How many boxes of a particular item do we have in stock?  


 =IF(ISERR(F88),CHOOSE(ERROR.TYPE(F88)/3,"No such product.","Duplicates products found."),"One product found.")


Thursday, September 1, 2011

How to use Ms Excel SUM and the =OFFSET function

    SUM and the =OFFSET function


       Sometimes it is necessary to base a calculation on a set of cells in different locations. An example would be when a total is required from certain months of the year, such as the last 3 months in relation to the current date.

One solution would be to retype the calculation each time new data is entered, but this would be time consuming and open to human error.

     A better way is to indicate the start and end point of the range to be calculated by using the =OFFSET() function.

The =OFFSET() picks out a cell a certain number of cells away from another cell. By giving the =OFFSET() the address of the first cell in the range which needs to be totalled, we can then indicate how far away the end cell should be and the =OFFSET() will give us the address of cell which will be the end of the range to be totalled.

The =OFFSET() needs to know three things; 1. A cell address to use as the fixed point from where it should base the offset. 2. How many rows it should look up or down from the starting point. 3. How many columns it should look left or right from the starting point.


                                  =SUM(E24:OFFSET(E24,0,0))
This example uses E24 as the starting point and offsets no rows or columns which results in the range being summed as E24:E24.


                                    =SUM(E29:OFFSET(E29,0,1))
This example uses E29 as the starting point and offsets 1 col to pick out cell F29 resulting in a the range E29:F29 being summed.


                                    =SUM(E34:OFFSET(E34,0,2))
This example uses E34 as the starting point and offsets 2 cols to pick out
cell G34 resulting in a the range E34:G34 being summed.


Using =OFFSET() Twice In A Formula


     The following examples use =OFFSET() to pick both the start and end of the range which needs to be totaled.  


                                   =SUM(OFFSET(E45,0,1):OFFSET(E45,0,1))
     The cell E45 has been used as the starting point for both offsets and each has been offset by just 1 column. The result is that just cell F45 is used as the range F45:F45 for the sum function to calculate.


                                     =SUM(OFFSET(E51,0,1):OFFSET(E51,0,2))
     The cell E51 has been used as the starting point of both offsets, the first offset is offset by 1 column, the second by 2 columns. The result is the range F51:G51 which is then totalled.  


                                     =SUM(OFFSET(E57,0,1):OFFSET(E57,0,3))
     The cell E57 has been used as the starting point for both offsets, the first offset is offset by 1 column, the second by 3 columns. The result is the range F57:H57 which is then totalled.  


Example
     The following table shows five months of data. To calculate the total of a specific group of months the =OFFSET() function has been used. The Start and End dates entered in cells F71 and F72 are used as the offset to produce a range which can be totaled.


Explanation 
 The following formula represent a breakdown of what the =OFFSET function does. The  formula displayed below are only dummies, but they will update as you enter dates into cells F71 and F72.  

       Formula 1 =SUM( OFFSET(D79,0,MONTH(F71)) : OFFSET(D79,0,MONTH(F72)) ) This is the actual formula entered by the user.        


       Formula 2 =SUM( OFFSET(D79,0,MONTH(2)) : OFFSET(D79,0,MONTH(3)) ) This shows how the =MONTH function calculates the month number. In this example the values of the months are 2 and 3 for Feb and Mar. These values are the 'offsets' relative to cell D79. 


       Formula 3 =SUM( OFFSET(D79,0,2) : OFFSET(D79,0,3) ) This shows where the month numbers are used in the =OFFSET function. 


       Formula 4 =SUM( F85:G85 ) This shows how the =OFFSET eventually equates to cell addresses to be used as a range for the =SUM function.        


Hopefully now you all can understand how to use OFFSET function in Ms Excel. If any one having any idea better than this please share your thoughts / comments here.


Twitter Bird Gadget